Database Operations
Table of contents
1. Overview Table of Contents
This page goes over the available ways users can manage a database with chappy.php Using the console, you can perform migrations, drop tables, and other tasks. A complete description of all Migration class function can be within the project API Documentation.
2. Migration Table of Contents
Performing a database migration is the first task you will perform after establishing a new project. Before you begin you will need to open the .env file and enter some information about the database. An example is shown below:
# Set to mysql or mariadb for production
DB_CONNECTION=sqlite
DB_HOST=127.0.0.1
DB_PORT=3306
# Set to your database name for production
# DB_DATABASE=database/database.sqlite
DB_USER=root
# DB_PASSWORD=
Next, create the database using your preferred method. We like to use phpMyAdmin and Adminer.
Finally, you can run the migrate command shown below:
php console migrate
If you make a mistake or need a fresh start you can perform a refresh as described below:
php console migrate:refresh
Performing a the migrate and refresh commands will add a new record to a migrations table whose purpose is to track all previous migrations. When you create a one or more new migrations only those will be executed. You can also modify an existing table with a new migration. More one building your own migrations will be covered in the next section called Create Migration.
Finally, if you just want to drop tables perform the following command:
php console migrate:drop-all
Performing either of these commands will result in status messages being displayed in the console.
3. Creating A New Migration Table of Contents
Create a migration by running the make:migration command. An example is shown below for a table called foo:
php console make:migration foo
Once you perform this action a migration class is created with two functions called up and down. Up is used to create a new table or update an existing one. Down drops an existing table. We usually don’t modify the down function. The output from the previous command is shown below:
namespace Database\Migrations;
use Core\Lib\Database\Schema;
use Core\Lib\Database\Blueprint;
use Core\Lib\Database\Migration;

/**
 * Migration class for the foo table.
 */
class Migration1741215401 extends Migration {
    /**
     * Performs a migration.
     *
     * @return void
     */
    public function up() {
        Schema::create('foo', function (Blueprint $table) {
          $table->id();

      });
    }

    /**
     * Undo a migration task.
     *
     * @return void
     */
    public function down() {
        Schema::dropIfExists('foo');
    }
}
The up function automatically creates a $table variable set to the value you entered when you ran the make:migration command along with a function call to create the table. In the code snippet below we added some fields.
namespace Database\Migrations;
use Core\Lib\Database\Schema;
use Core\Lib\Database\Blueprint;
use Core\Lib\Database\Migration;

/**
 * Migration class for the foo table.
 */
class Migration1741215401 extends Migration {
    /**
     * Performs a migration.
     *
     * @return void
     */
    public function up() {
        Schema::create('foo', function (Blueprint $table) {
            $table->id();
            $table->string('bar', 150)->nullable();
            $table->timestamps();
            $table->softDeletes();
            $table->integer('user_id');
            $table->index('user_id');
      });
    }

    /**
     * Undo a migration task.
     *
     * @return void
     */
    public function down() {
        Schema::dropIfExists('foo');
    }
}
string is the most common function that is used. We call this function to create a field called bar whose type is varchar. The second argument is used to set the size of this field. For this field we also chain the nullable function to allow this field’s value to be null.
addTimeStamps creates created_at and updated_at fields. addSoftDelete is used as a setting where you want to removed a record from being returned from any database query. It serves as a safety net that allows you to permanently delete the record later or preserve for later use.
The function call on line 11 adds a user_id field and the next line sets this field as an index. It is a common way to create relationships with this and the Laravel framework.
Run the migration and the console output, if successful, will be shown below:
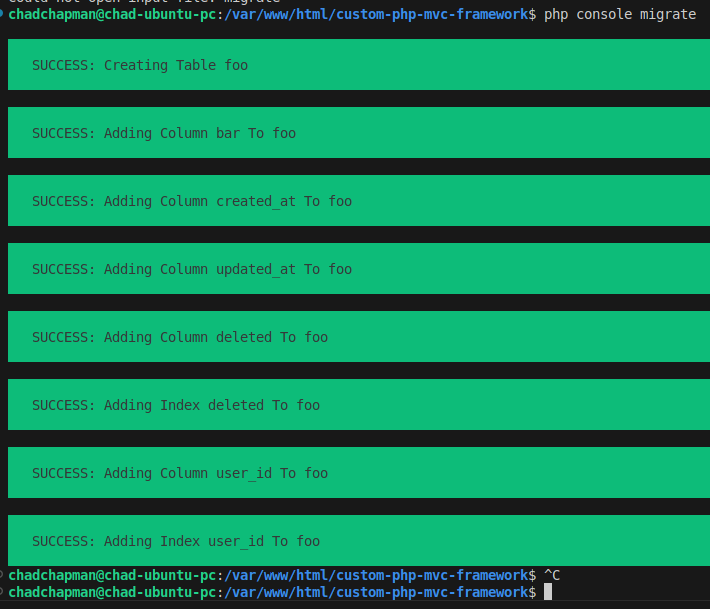
Figure 1: Console output after running the migrate command.
Open your database management software package and you will see that the table has been created.
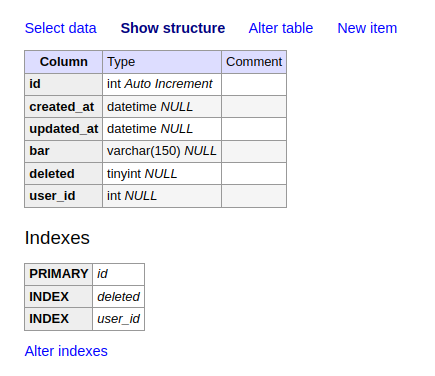
Figure 2 - New database table after migration was performed